Simply explained: How to install dining room pendant lamps correctly
The installation of a dining room pendant lamp can significantly enhance the atmosphere in your dining area. A dining room pendant lamp not only provides pleasant lighting but also adds stylish accents. With clear instructions and some handy skills, mounting a dining room pendant lamp can be done effortlessly. All you need are the right tools and a basic understanding of the individual steps.
Key Insights
-
Choose a lamp that creates cozy light and fits the table size.
-
Hang the lamp about 60 cm above the table to ensure even light distribution.
-
Use tools like screwdrivers and voltage testers to work safely.
-
After installation, check that the lamp is securely attached and the wires are safe.
-
Use dimmable bulbs to adjust the light as desired.
Preparing for Installation
Selecting the Right Dining Room Pendant Lamp
Choosing the right dining room pendant lamp affects not only the lighting but also the atmosphere in your dining area. Ensure that the lamp provides cozy illumination. A central suspension above the dining table creates a harmonious focal point. For rectangular tables, longer fixtures or multiple pendant lights work particularly well. Hang the lamp at a height of 50–70 cm above the table to avoid glare. If you want to adjust the lighting mood flexibly, choose a lamp with dimmable LED lights. This way, you create a pleasant and functional lighting environment.
Required Tools and Materials
For the installation of your dining room pendant lamp, you will need some basic tools and materials. Have the following tools ready:
-
Household ladder
-
Phillips and flathead screwdrivers
-
Voltage tester (phase tester)
-
Drill or cordless screwdriver
-
Wire stripper
-
Side cutters
-
Needle-nose pliers
Additionally, you will need materials such as wire connectors or terminal blocks, dowels, and suitable screws. For larger fixtures, screw hooks can be helpful. Silicone tubes can be used to insulate the connection wires. With these tools and materials, you are well-prepared.
Taking Safety Precautions
Safety should be your top priority when installing your lamp. Before starting work, turn off the power at the circuit breaker. Use a voltage tester to ensure that there is no voltage present. Never work on electrical wiring if you are unsure. In such cases, consult an electrician. Wear non-slip shoes and use a stable ladder to avoid accidents. With these precautions, you can work safely and install your dining room pendant lamp without any issues.
The Optimal Height for Dining Room Pendant Lamps
Correct Distances to the Dining Table
The height of your dining room pendant lamp plays a crucial role in the lighting and comfort at the dining table. A lamp that hangs too low can obstruct the view and disturb dining. Hang the lamp about 60 cm above the tabletop. This height ensures even illumination of the table without blinding those seated.
If you have a rectangular table, make sure the lamp covers the entire table surface. For round tables, a central pendant light is sufficient. Position the lamp centrally above the table to ensure harmonious light distribution.
Another important point is glare-free lighting. Choose a lamp with a suitable lampshade or a matte cover to avoid unpleasant light reflections. This creates a pleasant atmosphere for meals and conversations.
Adjusting to Room Height and Table Size
The room height and the size of the dining table influence the ideal position of your dining room pendant lamp. In rooms with high ceilings, you can hang the lamp a bit lower to create a cozy light mood. In rooms with low ceilings, the lamp should be mounted higher to avoid visually shrinking the space.
The size of the table also determines the choice of lamp. For large tables, elongated pendant lights or several smaller lamps in a row are suitable. For small tables, a single lamp that directs light specifically onto the table surface is sufficient.
Architectural calculations show that a height of about 60 cm above the table is ideal. This height provides sufficient light without obstructing the view. Ensure that the lamp does not hang too close to the ceiling, as this can limit the light effect.
With the right adjustment to room height and table size, you can ensure that your dining room pendant lamp fits perfectly both functionally and aesthetically into the space.
Step-by-Step Guide to Installation
Turn Off Power and Check Circuit Breaker
Before you begin installing your dining room pendant lamp, you must turn off the power. Go to the circuit breaker and switch off the breaker for the corresponding room. Then use a voltage tester to ensure that there is no voltage present in the wires. This precaution protects you from electric shocks and ensures a safe working environment.
Tip: Make sure that no current is flowing through the line before you start the installation. Safety is the top priority.
Attaching the Bracket to the Ceiling
The bracket of your dining room pendant lamp must be securely attached to the ceiling. First, mark the drill holes with a pencil. Use a drill to make the holes and insert suitable dowels. Secure the bracket with the provided screws. Ensure that the bracket is straight and securely positioned.
If your ceiling is made of a special material like drywall, you may need special dowels or screws. A stable attachment is crucial to ensure that the lamp hangs securely and does not wobble.
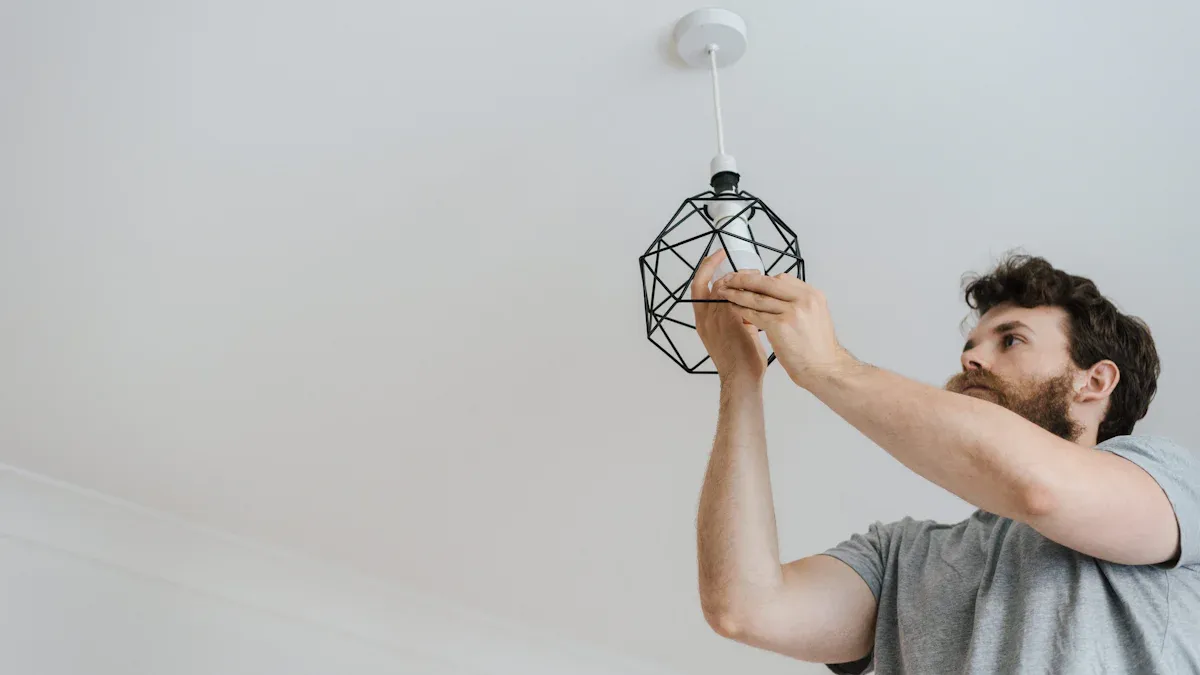
Wiring the Dining Room Pendant Lamp
Wiring is a central step in the installation. Connect the lamp's wires to the corresponding wires from the ceiling. Typically, there are three wires: phase (brown or black), neutral (blue), and ground (yellow-green). Use wire connectors or terminal blocks to securely connect the wires.
Note: The correct wiring must comply with the applicable DIN VDE regulations. Here are some important standards:
|
Aspect |
Details |
|---|---|
|
Safety Requirements |
Use of insulated wiring material according to the applicable DIN VDE regulations. |
|
Ground Wire |
Connecting the ground wire to devices and outlets is required. |
|
Comparison with Other Rooms |
The same connection conditions apply as in other rooms, except in bathrooms. |
After connecting the wires, carefully check the connections. Tighten the screws in the wire connectors to ensure a secure contact. Wrap the connections with insulating tape if necessary to provide additional safety.
Tip: Work precisely and avoid loose wire connections. Incorrect wiring can lead to short circuits or other problems.
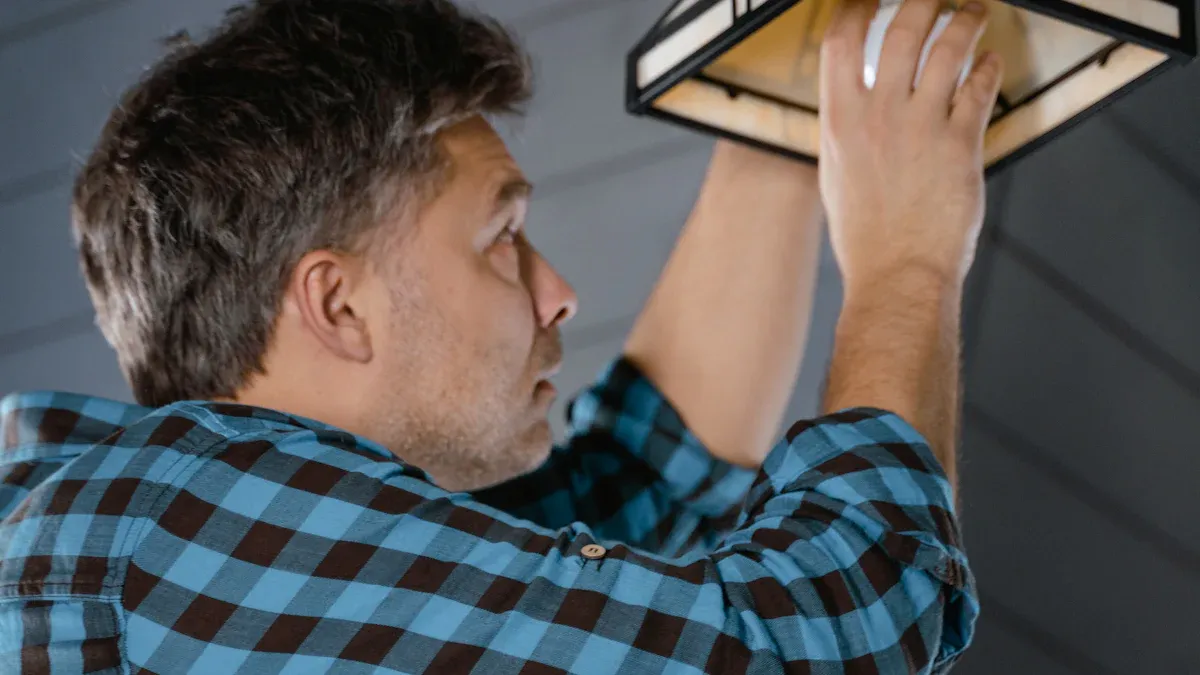
Mounting and Securing the Lamp
Mounting and securing the lamp is a crucial step to ensure safety and stability. Start by carefully lifting the lamp onto the prepared bracket. For larger fixtures, such as a crystal chandelier, it is advisable to ask a second person for help. This makes installation easier and minimizes the risk of damage.
Tip: Turn off the circuit breaker before installation to avoid injuries from electric shock.
Once the lamp is hanging from the bracket, check that it is aligned correctly. Tighten the screws to ensure that the lamp is securely fixed. Be careful not to pinch any wires, as this could impair functionality.
If the lamp has adjustable elements, such as a joint or chain, check these before final fixation. This ensures that the lamp can be easily adjusted later.
Adjusting the Height of the Lamp
Adjusting the height of your dining room pendant lamp is important to optimally tailor the lighting to your needs. Many modern lamps, such as the MeLiTec LED Pendant Light DP15, offer an easy way to change the height. Check before installation whether your lamp is adjustable.
Some models, like the Mito sospeso pendant lights, allow for stepless height adjustment between 50 and 200 cm. The maximum pendant height can even reach up to 350 cm. To adjust the height, gently release the cable brakes and set the lamp to the desired position.
Note: Correct height adjustment not only creates a pleasant light mood but also prevents the lamp from being intrusive during meals.
When adjusting the height of your lamp, ensure that it hangs evenly and does not put tension on the wires. This prolongs the lifespan of the lamp and ensures safe use.
With a well-adjusted height, you can perfectly match the dining room pendant lamp to the room height and table size. This way, your dining room will not only be functional but also stylishly illuminated.
Fine-Tuning and Function Test
Testing and Adjusting the Lighting
After installing your dining room pendant lamp, you should test the lighting. Turn the power back on and check if the lamp functions as desired. Ensure that all bulbs illuminate evenly and that there is no flickering. If the lamp is dimmable, test the different brightness levels.
To adjust the lighting, you can slightly change the position of the lamp. Check if the dining table is evenly illuminated. If shadows occur, adjust the height or angle of the lamp. Optimal lighting creates a pleasant atmosphere and prevents glare.
Tip: Use warm white bulbs to create a cozy atmosphere in the dining room. This color temperature is particularly suitable for relaxed meals.
Optimizing Dimming and Light Mood
A dimmable dining room pendant lamp offers you the flexibility to adjust the light mood. Studies show that individually controllable lighting enhances well-being. Changing the color temperature can create a pleasant atmosphere and promote concentration.
-
Office employees prefer controllable LED lighting.
-
Changes in color temperature positively affect well-being.
-
Customizable lighting enhances cognitive performance and creates a pleasant environment.
Utilize these benefits in your dining room as well. Dim the light for a romantic dinner or increase the brightness for family gatherings. With adjustable lighting, you can make optimal use of the space.
Checking Stability and Safety
Finally, you should check the stability and safety of the lamp. Ensure that all screws are tightened and that the lamp hangs securely from the ceiling. If the lamp wobbles, tighten the attachments.
Also, check the wire connections. Loose wires can cause short circuits. Ensure that no wires are visible and that all connections are insulated. A stable and secure installation ensures a long lifespan for your lamp and protects against accidents.
Note: Regularly checking the lamp helps to identify and resolve potential issues early.
The installation of a dining room pendant lamp can be accomplished with the right preparation and precise execution. Use the appropriate tools and follow the described steps to achieve a safe and stylish result. If you are uncertain, consult an electrician to avoid potential risks. A correctly installed lamp not only creates a pleasant atmosphere but also ensures optimal lighting for your dining room. With a little patience and care, you can enhance and functionally design your home.
FAQ
How do I find the right height for my dining room pendant lamp?
The ideal height is about 60 cm above the tabletop. This position ensures even lighting and prevents glare. In rooms with high ceilings, you can hang the lamp a bit lower. Ensure that the lamp does not obstruct the view.
What tools do I need for installation?
You will need a household ladder, screwdrivers, a voltage tester, a drill, a wire stripper, and side cutters. Additionally, you will need dowels, screws, and wire connectors. With these tools, you can securely and stably mount the lamp.
Can I do the installation myself?
Yes, if you observe safety precautions and follow the instructions carefully. Turn off the power and check the wires with a voltage tester. However, if you are uncertain, you should consult an electrician to avoid risks.
Which lamps are suitable for rectangular dining tables?
For rectangular tables, elongated pendant lights or several lamps in a row are ideal. They cover the entire table surface and provide even lighting. Ensure that the lamps are dimmable to adjust the light mood flexibly.
How do I check safety after installation?
Check that all screws are tightened and that the lamp hangs securely. Inspect the wire connections for a firm fit and insulation. Turn on the power and test the lighting. Regular checks help to identify potential problems early.